• Home
  • DIY’s
    • Blogging Tips
    • Contests/Challenges
    • Holidays
      • Christmas
      • Halloween DIY’S
    • Printables
    • Link Parties
    • Aspiring Designers
  • Sewing
    • Holidays
      • Easter Sewing
      • Halloween Sewing
    • Kids
    • Kids Crafts
    • Ladies
    • Sewing Tips
  • Shop Craft Supplies
    • Fabric Shop Directory
    • Pattern Shops Directory
    • Patterns On Sale
    • Sewing Supplies
  • Pattern Reviews
  • Submit A DIY
  • Recipes
  • About
    • Terms of Service – Disclosure Policy
    • Contact
  • Skip to primary navigation
  • Skip to main content
  • Skip to primary sidebar
  • Skip to footer
  • Home
  • DIY’s
    • Blogging Tips
    • Contests/Challenges
    • Holidays
      • Christmas
      • Halloween DIY’S
    • Printables
    • Link Parties
    • Aspiring Designers
  • Sewing
    • Holidays
      • Easter Sewing
      • Halloween Sewing
    • Kids
    • Kids Crafts
    • Ladies
    • Sewing Tips
  • Shop Craft Supplies
    • Fabric Shop Directory
    • Pattern Shops Directory
    • Patterns On Sale
    • Sewing Supplies
  • Pattern Reviews
  • Submit A DIY
  • Recipes
  • About
    • Terms of Service – Disclosure Policy
    • Contact

DIY Crush

Free DIY Patterns & Tutorials

How To Make Bias Tape – Continuously

February 13, 2016 by Denise 15 Comments

Have you wondered how to make bias tape? Do you wish there was an easier way to make bias tape without having to cut lots of strips and sew them together?  This is about the easiest way I’ve learned it! It won’t take long at all and it saves so much fabric because you don’t have to cut it on the bias! I also show you my favorite way of storing bias tape. See the details in this tutorial.

How To Make Bias Tape in one continuous piece

{this post contains links to affiliates. Please see my disclosure policy}

Making bias tape yourself has so many advantages! See some great points here:

  1. It can be made to nicely match your main fabric print
  2. It can be made from the same type of material so your project will look professional
  3. It is cheaper than buying ready made bias tape
  4. You can use up those remnants or even fat quarters

⇓ – – – – –  PIN THIS – – – – – ⇓

How to make bias tape the easy way. A detailed tutorial | DIY Crush

Gather Your Supplies to make bias tape:

  • fabric (I used this pretty floral print from Robert Kaufman’s Cherry Blossom Garden Collection)
  • bias tape maker tool (I alternate between by old (shown) one and this one, the Clover Bias Tape Maker)
  • fabric scissors (my favorites are from Fiskars)
  • lip edge ruler
  • cutting mat
  • rotary cutter (optional)
  • straight pins (I’m in love with these heart shaped pins!)
  • empty toilet paper roll
  • tape

Let’s get started:

Sizing guide:

  • 13.5″ square piece will yield about 73″ bias tape
  • 16″ square piece will yield about 110″ bias tape
  • 23″ square piece will yield about 228″ bias tape

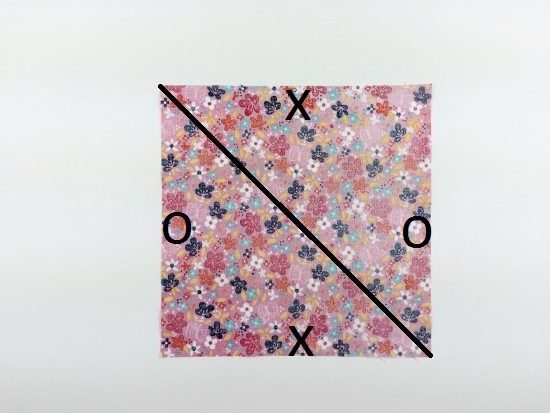
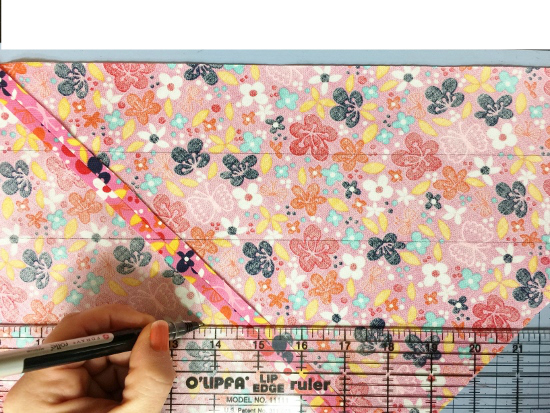
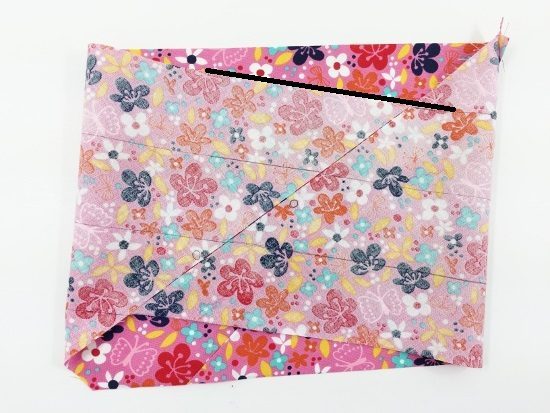
This is your cut square fabric piece. Place it in front of you with WRONG side up and draw a straight line from one of the bottom corners to the opposite top corner. Then cut with scissors or directly on your cutting mat with lip edge ruler and rotary cutter. With your marker write an X at the top edge and one at the bottom edge of the fabric. Write an O at the side edges. This will be for matching up the edges later.

How To Make Bias Tape. A detailed tutorial of a great method that saves time, fabric and headache | DIY Crush

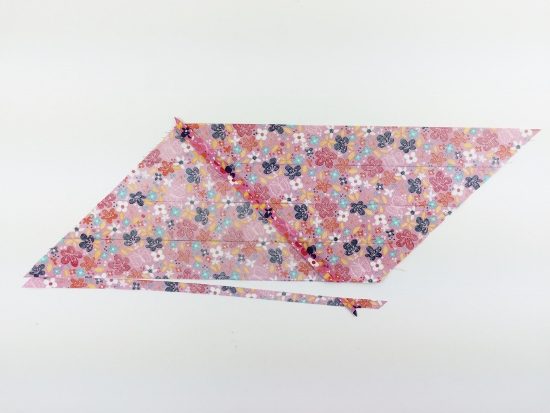
Once cut, place the pieces with right sides together, matching up the X’s and O’s.

How To Make Bias Tape. A detailed tutorial of a great method that saves time, fabric and headache | DIY Crush

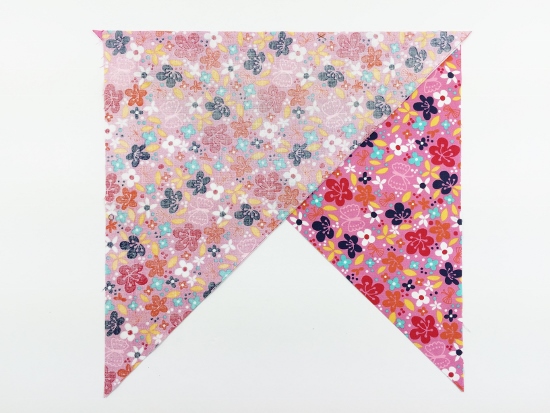
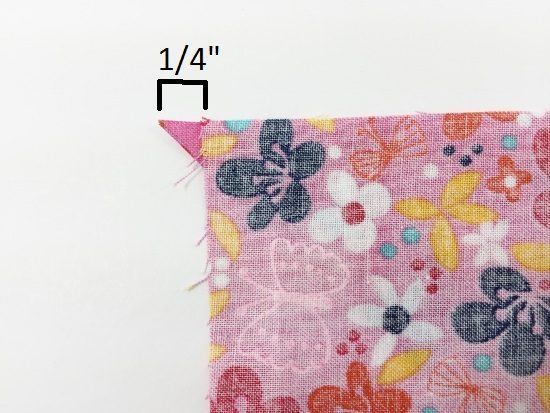
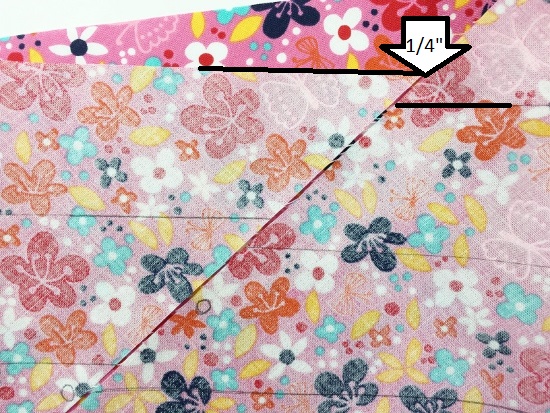
The pieces should slightly mismatch on the top edge meaning, move the top piece ¼ inch over to the right so that the right corner hangs over and the left corner is showing the under piece.

How To Make Bias Tape.  A detailed tutorial of a great method that saves time, fabric and headache | DIY Crush

Pin edges together and sew along dashed line. Do not serge or zigzag stitch.

How To Make Bias Tape. A detailed tutorial of a great method that saves time, fabric and headache | DIY Crush

Press seam open and draw lines right over the seam, with a 2 inch distance starting at the top edge.

How To Make Your Own Bias Tape. A detailed tutorial of a great method that saves time, fabric and headache | DIY Crush

There will be some excess on the bottom after the last line. Trim it off so that all lines have the same distance of 2”.

How To Make Continuous Bias Tape. A detailed tutorial of a great method that saves time, fabric and headache | DIY Crush

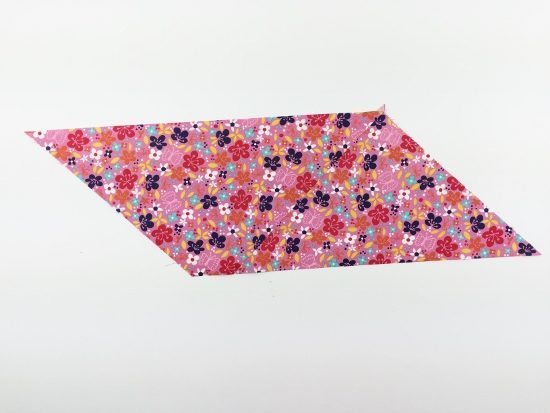
Now we get to sew our parallelogram (*what is that?) together to form a tube in order to cut continuous strips of fabric. Flip the piece over so that the right side of the fabric is facing you.

How To Make Continuous Bias Tape. A detailed tutorial of a great method that saves time, fabric and headache | DIY Crush

Fold in both short edges.

How To Make Continuous Bias Tape. A detailed tutorial of a great method that saves time, fabric and headache | DIY Crush

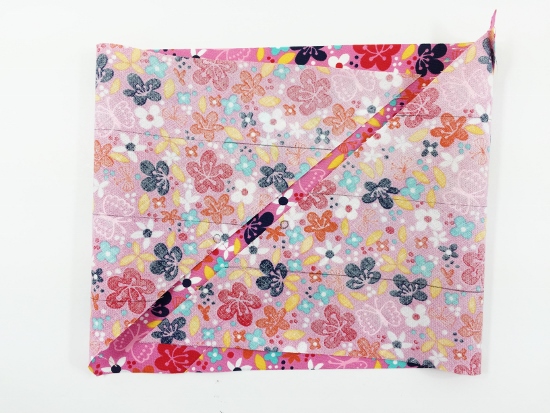
Match the drawn lines, not exactly but one row shifted down. See how it forms an uneven design, almost diagonally looking. This is necessary in order to cut strips in one piece all the way through.

How To Make Continuous Bias Tape. A detailed tutorial of a great method that saves time, fabric and headache | DIY Crush

One last step before we can sew these edges together. Move the top edge of the left side up ¼” so that the left sides top edge is slightly off with the line of the right side.

How To Make Continuous Bias Tape. A detailed tutorial of a great method that saves time, fabric and headache | DIY Crush
Click page 2 to see the next steps!

  • Author
  • Recent Posts
Follow me
Denise
Hi! I'm a craft & sewing loving mom of 2 (+ 1 dog). When I am not crafting or sewing, you can find me playing with my kids and dogs! I am a slow cooker & coffee addict. My favorite color is any color and I have a degree in business management. Hope to inspire you to DIY with me!
Follow me
Latest posts by Denise (see all)
  • Free Welcome To Our Farm SVG File - July 17, 2021
  • Professional Overthinker SVG File – Download Today! - July 8, 2021
  • Free Wine Lover SVG Files – Download NOW! - July 7, 2021
Post Views: 27,218
Pages: Page 1 Page 2

Reader Interactions

Comments

  1. Reece says

    February 15, 2016 at 10:45 pm

    Wow, that is so awesome! I’ll have to give that a try!

    Reply
  2. kapila hans says

    February 15, 2016 at 11:17 pm

    this is very useful tip… thank you.

    Reply
  3. ulrikessmaating says

    February 26, 2016 at 1:39 pm

    so simply and it works :0) greetings from denmark ulrike

    Reply
  4. Domenica says

    February 26, 2016 at 2:14 pm

    Thanks for the great tutorial! You make it look so easy!

    Reply
  5. Pam @Threading My Way says

    February 26, 2016 at 9:09 pm

    I’ll be trying this out next time I make bias binding. Very thorough tutorial.

    Reply
    • Pam @Threading My Way says

      February 28, 2016 at 6:39 pm

      Featured today, Denise…

      Reply
  6. Rochelle @ eSheepDesigns says

    February 27, 2016 at 10:58 am

    Great tutorial! I’ve seen instructions for this process before but I must say that you have truly simplified it. Bookmarked your page; will refer to it in future… when I get myself one of those bias tape maker thingies.

    Reply
  7. Cucicucicoo: Eco Sewing and Crafting says

    February 29, 2016 at 5:10 am

    I’d seen this technique before, but hadn’t tried it because it looks complicated. But you’ve made it look so easy, I can’t wait to try it out! 🙂 Lisa

    Reply
  8. Laura Middleton says

    March 22, 2016 at 10:14 am

    Very nice but easier ways I found this very complicated. Sorry.

    Reply
  9. Heather says

    May 4, 2016 at 1:10 am

    I just finished reading another tutorial on how to do this and ended up extremely confused. But after reading yours, it’s all clear to me! Thank you so much!!

    Reply
  10. Joanne says

    July 30, 2016 at 5:11 pm

    Great tutorial- thank you!!

    Reply
    • Denise says

      July 30, 2016 at 7:17 pm

      Thank you so much!

      Reply
      • Joanne says

        July 31, 2016 at 9:50 am

        One quick question — can you explain briefly one small thing. Right before sewing you suggest moving the left side up so the lines are out of alignment, then when sewed they fall back into alignment. I wanted to understand a little about the why of that– is it compensating for the feed dog dragging the piece a little bit? If so, I was wondering if using a walking foot might eliminate that drag? Thanks so much

        Reply
        • Denise says

          July 31, 2016 at 5:23 pm

          Thank you so much for checking out this post! The reason why the fabric has to be moved is because of the seam allowance. If you weren’t going to SEW, just laying the fabric edges against each other and perfectly lining up the drawn line, it would be fine. But since we are sewing the fabric together, a seam allowance will be created and the drawn lines would shift BECAUSE of the seam allowance. Then they wouldn’t line up anymore for us to cut along the line. Let me know if this will help understanding why we move the lines.

          Reply
  11. Jenny R says

    December 1, 2017 at 8:59 am

    I love your tutorial! I have it saved under my Pinterest’s “sewing” category and I have come back to it frequently when needing to create my own bias binding. It is so easy to follow and it really does make a LOT of bias binding! Thanks so much for the detailed tutorial— it has been well used and appreciated!

    Reply

Leave a Reply Cancel reply

Your email address will not be published. Required fields are marked *

Primary Sidebar

  • Facebook
  • Instagram
  • Pinterest
  • RSS
  • Twitter
  • YouTube

Popular Posts

  • Free PJ Pattern Featuring Organic Cotton Plus Knit Fabric Free Knit Pajama Sewing Pattern under Kids , Sewing
  • Free Fleece Mittens Sewing Pattern at DIY Crush Free Fleece Mittens Sewing Pattern under Kids , Sewing

This blog contains affiliate links.

See our disclosure policy in the 'Terms & Conditions' at the bottom of this page.

Get on the freebie list

Footer

Archives

See us on Pinterest

Visit DIY Crush Marketplace's profile on Pinterest.

Looking For Something?

  • Home
  • DIY’s
    • Blogging Tips
    • Contests/Challenges
    • Holidays
      • Christmas
      • Halloween DIY’S
    • Printables
    • Link Parties
    • Aspiring Designers
  • Sewing
    • Holidays
      • Easter Sewing
      • Halloween Sewing
    • Kids
    • Kids Crafts
    • Ladies
    • Sewing Tips
  • Shop Craft Supplies
    • Fabric Shop Directory
    • Pattern Shops Directory
    • Patterns On Sale
    • Sewing Supplies
  • Pattern Reviews
  • Submit A DIY
  • Recipes
  • About
    • Terms of Service – Disclosure Policy
    • Contact

© 2023 · DIY Crush · Terms and Conditions

This website uses cookies to improve your experience. We'll assume you're ok with this, but you can opt-out if you wish.Accept Read More
Privacy & Cookies Policy

Privacy Overview

This website uses cookies to improve your experience while you navigate through the website. Out of these, the cookies that are categorized as necessary are stored on your browser as they are essential for the working of basic functionalities of the website. We also use third-party cookies that help us analyze and understand how you use this website. These cookies will be stored in your browser only with your consent. You also have the option to opt-out of these cookies. But opting out of some of these cookies may affect your browsing experience.
Necessary
Always Enabled
Necessary cookies are absolutely essential for the website to function properly. This category only includes cookies that ensures basic functionalities and security features of the website. These cookies do not store any personal information.
Non-necessary
Any cookies that may not be particularly necessary for the website to function and is used specifically to collect user personal data via analytics, ads, other embedded contents are termed as non-necessary cookies. It is mandatory to procure user consent prior to running these cookies on your website.
SAVE & ACCEPT
 

Loading Comments...