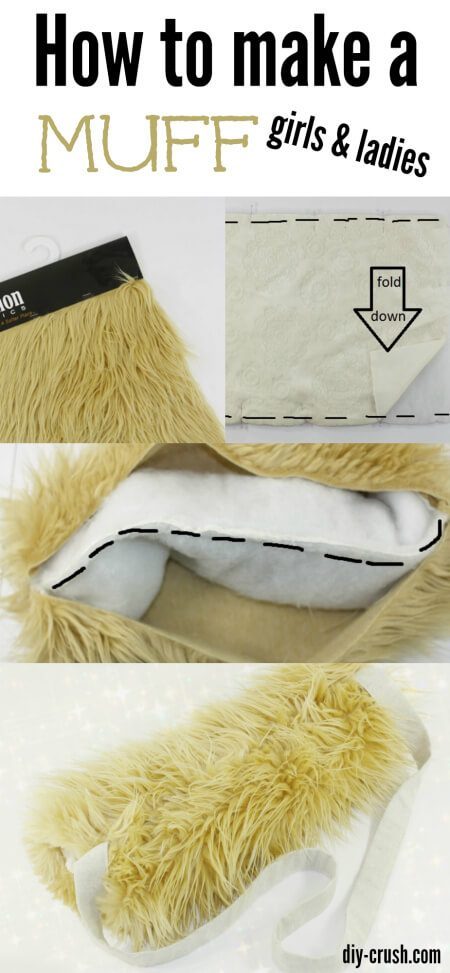
How To Make A Muff For Ladies And Girls
Origin of MUFF
Dutch mof, from Middle French moufle mitten, from Medieval Latin muffula

Let’s gather the supplies
- faux fur material
- inner material such as Cuddle fabric
- strap material such as cotton, muslin etc. something sturdy and non-stretch, webbing or grossgrain ribbon would work
- thick batting
- sewing machine
- rotary cutter (optional)
- lip edge ruler (optional)
- scissors
- iron & ironing board
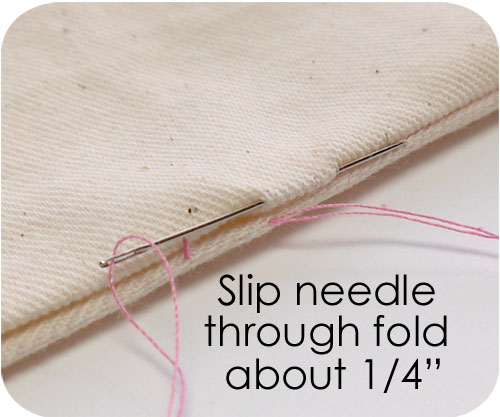
- double threaded hand sew needle with about 10″ of double thread, double knotted
.jpg)
.jpg)
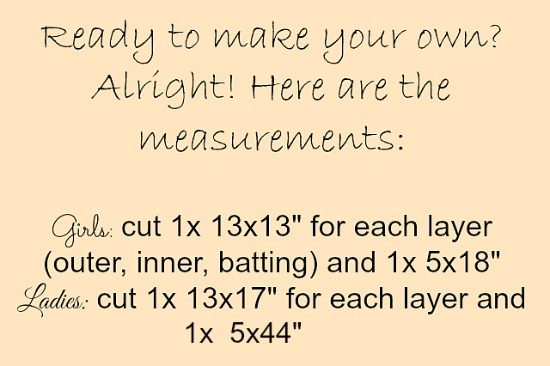
Ready to begin sewing
.jpg)
.jpg)
.jpg)
.jpg)
.jpg)
Place the faux fur piece on top of the just sewn piece, with right side down.
.jpg)
Sew along the dashed line (short ends on the ladies’ version and other ends on the child’s)
.jpg)
It’s time to turn the 3-layer piece with right sides out. Turn it so the batting is on the inside. Then the top and bottom corner of the right side are going to meet………
.jpg)
With your hand, grab the top and bottom corners of the right side and bring them together…..
.jpg)
.jpg)
.jpg)
Sew along the dashed lines with backstitching the beginning and end:
.jpg)
Fold the outer material away or down so that your piece looks like this now. Place the strap ends above the muff as shown:
.jpg)
Place the center of the strap inside the muff where the outer fabric is:
.jpg)
Align the left strap end with the corner of the muff’s outer material:
.jpg)
.jpg)
.jpg)
.jpg)
.jpg)
Last step to finish your muff
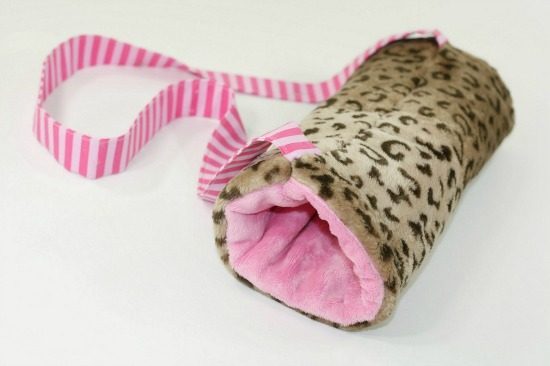
I hope you enjoyed this tutorial on how to make a muff! You can download the PDF from HERE!
If you liked this free muff sewing pattern tutorial, would you like us to email you when we have a new post up? Then hop on the list by entering your email on the sidebar! We promise, we only send you 1-2 emails per week!

- Free Snowflake Tumbler Wrap Designs for Download - September 24, 2023
- Free Welcome To Our Farm SVG File - July 17, 2021
- Professional Overthinker SVG File – Download Today! - July 8, 2021
Can’t wait to make one!!! Thanks for the tutorial!
I would like to have this pattern….. but when I try to copy & paste it into Word Document…… all I get is the words – no pictures. This muff cannot be made by me without pictures to help me follow. Could you please let me know how to get the “whole pattern”? Thank you.
Thank you for visiting, Paulette! I have added a download link for the PDF. Please go here: https://www.dropbox.com/s/maf6i8v231mff75/Muff%20sewing%20pattern.pdf?dl=0
I’m SO tickled about this! Thank you for sharing it! I’ve been kind of reminiscent about muffs for the last 2 or 3 years, even telling my hubby several times, how much I wished they’d come back in style- they’re very practical, for phones, especially, & the ones for couples who want to hold hands were popping up everywhere. I think he thought I was nuts, but he suggested that I “just make one, & who cares if it’s ‘in’? If you want it & like it, and know how to make it, what’s stopping you?”
Well, what was stopping me was the logistics! I couldn’t wrap my head around how it could be done without an awful lot of hand stitching. You’ve fixed that one for me, thank you!
Thank you so much for stopping by Carla!! I loved using my muff when I was little;) Enjoy making them and share pictures to the mentioned groups if you like. Happy holidays!
I am sorry, I must have not noticed your lovely comment until just now! I am so happy to hear that you like my pattern!! Please share some pictures on our facebook page (social media buttons on the very top).
I have enjoyed making thes, so far I have made two childrens ones and now I’m about to make some adult ones….Thankyou very much for a easy to follow pattern 🙂 🙂
That is so wonderful to hear, Rachel! I appreciate your lovely comment!
THANK YOU!!!! I have been looking all around at “how-to’s” for making a muff, and yours is the only one with such clear instructions on how to put it together so that you can turn it right-sides-out and have everything in the right place, with a minimum of hand-stitching to finish it.
JenP. Thank you so very much for your sweet comment!! I am thrilled to hear you like this tutorial! For more upcoming tutorials, patterns and more please join our mailing list! It’s on the top on the right.
I had a fancy white one that I wore to church when I was a girl–this brings back memories. 🙂
I also had a white one for church! 😉 Thanks for stopping by!
My granddaughter would love this!
Sandra, so happy to hear you might sew this!!
I love this idea! My American girl doll had a tiny little muff when i was a little girl and ever since I thought they were so romantic! Thanks for linking up this week at the Welcome Home Wednesday Linky Party! Can’t wait to see what you link up with us tomorrow at 7am!
So happy you like this!! Thanks for stopping by!
I couldn’t find the adult measurements. What are they? Did I miss them?
Thank you for checking out my post!
I have added the image. It sure was missing. Please take a look now.
On the step where you show the faux fur being placed you say to put it right face side up….but the picture shows the fabric face down. Which is correct?
Thank you!
Oh yes, that’s supposed to be ‘down’. Sorry about that!! I just corrected it.
Great tutorial with clear instructions !
And it looks clean and nice 🙂
Thank you so much for this great tutorial…
Grtz from Belgium !
Thank you so much for visiting!! Greetings to Belgium!!
Hello Denise,
I would like to make this muff for my granddaughter, who has been asking for one! My “old brain” is not understanding the step about folding under the corners and stitching a 3/8″ seam. Can you explain that a different way? The photograph isn’t too clear for this step. Are both the batting and lining folded under and stitched together on the two edges?
Thank you!
Hi there, so happy you are sewing this muff!! With corners I only mean that you would fold that one corner down that I left up for the picture. Basically just place the fabric onto of the batting, then pin and sew the top and bottom edges only. Hope this helps 😉 If not, let me know and I’ll try again!
Thank you for the response! I completed the muff as per your directions, and it turned out adorable. Granddaughter #3 loves it and now the other 3 granddaughters want! So, I’ll be making more. Thank you for a great tutorial.
That is fantastic news! thanks so much!
I coach a high school twirl team and our football team always extends their season. I’m constantly looking for ways to keep my twirlers hands warm. So last year (2016) I found this amazing muff tutorial. I made 14 of these awesome muffs for the twirlers, thier mascot and of course myself. We received so many compliments. Thanks so much!!!