Making your own clothes does not have to be difficult. Using sewing patterns is of course the easiest and safest way to create your wardrobe but what if you have that favorite piece of clothing you want to duplicate? How to sew a top from an existing top? Here is how I did it.
⇓ – – – – – PIN THIS – – – – – ⇓

>>this post contains affiliate links – see my disclosure here.<<
How to sew a top from an existing top
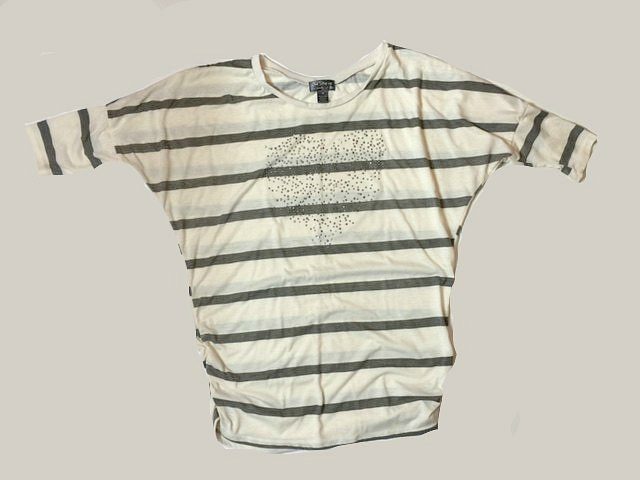
So I have this knit top that was slightly too tight but I loved the shape of it and that it was longer and had dolman sleeves. The sides were ruched which made them pull up slightly. All in all a cute and flattering top. I wanted another one like it but didn’t find a pattern for exactly the same look. That’s when I thought to make my own “patternless” top and I used only my serger to “sew” this.
The jersey knit fabric I used is from Girl Charlee. They have an amazing selection of knits for incredibly low prices, especially when you take advantage of their KnitFix deal, click banner below:

What You Need
- a well fitting top (or one that needs minor adjustments)
- knit fabric such as jersey knit or other lightweight knits (prewashed/dried)
- good fabric scissors
- measuring tape
- straight pins
- serger (or only a sewing machine)
Follow the step by step instructions
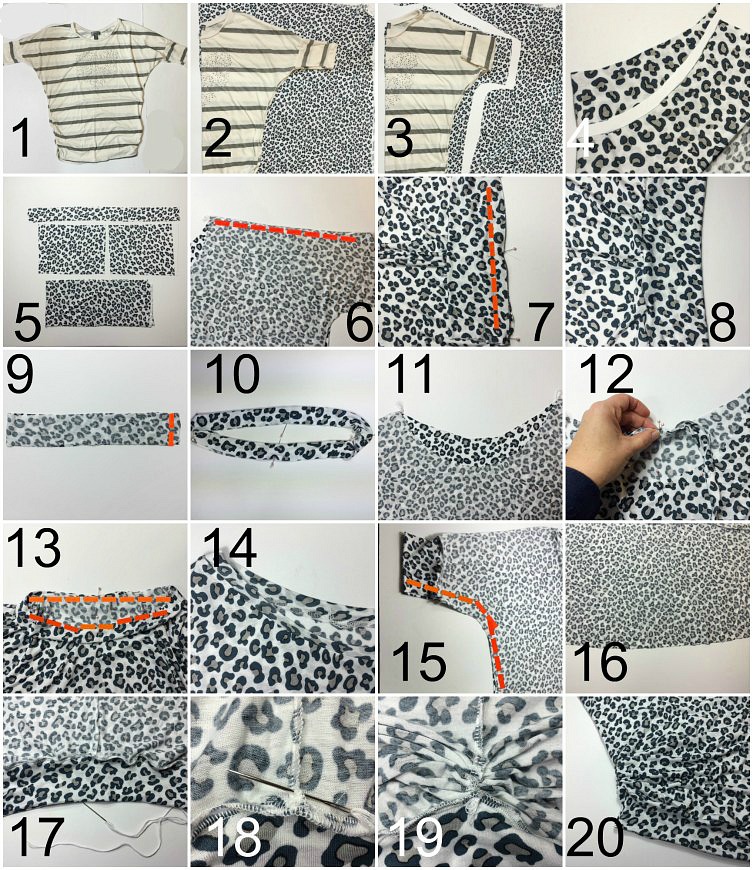
- This is my example top that I want to recreate.
- I folded my knit fabric over sideways (grain line is going down and if applicable the print direction should go down as well). I placed my folded in half top onto the fold of the fabric.
- I folded the sleeve bands back so I wouldn’t cut into them but also cut the sleeves a tad longer which is just my preference. I increased the total width to accommodate a looser fit and added some more length. TIP: if you want to recreate a top exactly you want to only cut around the shape of the top plus about 1/2 of an inch for seam allowance. This is the back I just cut out.
- I repeated this step to cut out the front and adjusted the lower neckline. I took in consideration that I wanted to add a new neckline band so I cut out the neckline area as close as possible to my existing top. A neckline is usually only 1″ or so wide and won’t need a large seam allowance so I was find cutting close to the example top.
- Here are my bands which are cut as follows: top is the neckline band which measures 1.25″ wide and about 4″ shorter than the entire new neckline measures. The image shows the neckline band folded over. Second are the sleeve bands which measure just as much as on the example top. I loved the look and wanted to keep it. The image shows one of my two waist bands and which is now folded in half and will ultimately make my waist band about 4.5″ long. I measured my hips and took 2″ off because I wanted the new top to sit snug.It’s a good rule of thumb to cut a shirt’s bottom band 2″ slimmer than what your hips measure in order to make the top sit snug around your hips.
- To sew the top, I put front and back of the top with right sides together and pinned the shoulder area.Serger settings: 1) differential feed at one step above 1.0 – 2) stitch length at 3 – 3) stitch width/cutting distance at 7 which makes for a nice wide serged area. See my settings below:
 Since I only used my serger I went right ahead and serged with 4 threads (2 threads in each needle and 2 in upper and lower looper). I repeated this with the other shoulder area.
 - I spread this side of the sleeve out and pinned one of the arm bands to it. Since my arm bands are shorter than the sleeve width I start pinning from the center and slightly stretch the band over to cover the entire sleeve hem. In some cases when I make a much slimmer band than my oversized sleeve I run a gathering stitch along the sleeve hem to gather the large area so it fits better onto the arm band without me having to stretch the band too much.
- This is how my sleeve with attached arm band looks now. I repeated this with other sleeve and arm band.
- To make the neckline band I put this strip with right sides together and stitched the short ends together.
- Then I folded this band in half so that the right sides are on the outside. With straight pins I sectioned this band in fourths.
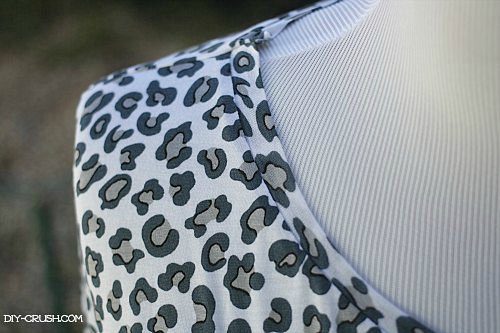
- Now it’s time to sew the neckline band onto the shirts top edge.
- I started with the neck band seam and placed it onto the outer side of the top’s neckline right into the center back. From there on I continued pinning the band to the entire neckline, spacing out the distance and gently stretching the neckband to cover the entire top’s neckline. I make sure to take my time because this step has to be as accurately as possible.
- I place many pins along the way to ensure a great look once it’s done. Since I used my serger I start serging slowly and pull out the pins as I go. While I serge I also make sure to check the underside of the neckline band to make sure not to serge into the fabric or to create unnecessary folds.
- This is now my finished neckband. I usually don’t top stitch unless the fabric really needs it. The material I am using is so soft and pliable, it really doesn’t need topstitching.
- It’s time to sew (or serge in my example) the sides under the sleeves and along the sides of the top.
- Now I am attaching the top bottom bands which I have already connected so I have a continuous tube of bands with two side seams. It’s easier for me to pin and serge them on with having the side seams as guides where I pin them to each side seam of the top.
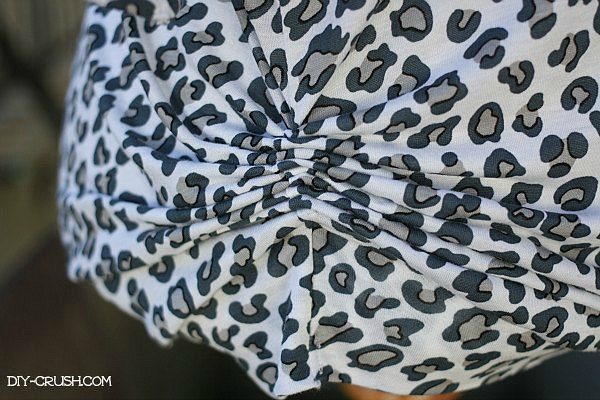
- My top would be done now but I wanted to recreate the ruched look on the sides so I threaded a large hand sew needle with embroidery thread (much more durable than regular sewing thread when manually ruching material).
- I knotted the end of the thread and inserted the needle into the inner seam (right above the band) so I wouldn’t poke through the actual shirt material since the inner seam will give me more stability for ruching.
- I keep inserting the needle in a zigzag fashion with a distance of about a half inch until I am almost at 5 or 6 inches. You can always test how much ruching you will really need by pulling on the thread to gather the material. I wanted to achieve a “good amount” of ruching so I stopped at 6″. I secured the stitches by stitching back and forth a few times, then I cut off the thread.
- And my job was (finally) done! It’s always a grand moment to see if I really succeeded.
I love how the top came out and since I had some fabric left over, I made my daughter an almost matching one 😉

If you enjoy free sewing patterns & tutorials, would you like us to email you when we have a new post up? Then hop on the list by entering your email on the sidebar! We promise, we only send you 1-2 emails per week!
I haven’t tired restyling (except for Halloween ) yet but, just might have to. Pinned & shared. Thanks for joining the Inspiration Spotlight party. See you again soon.