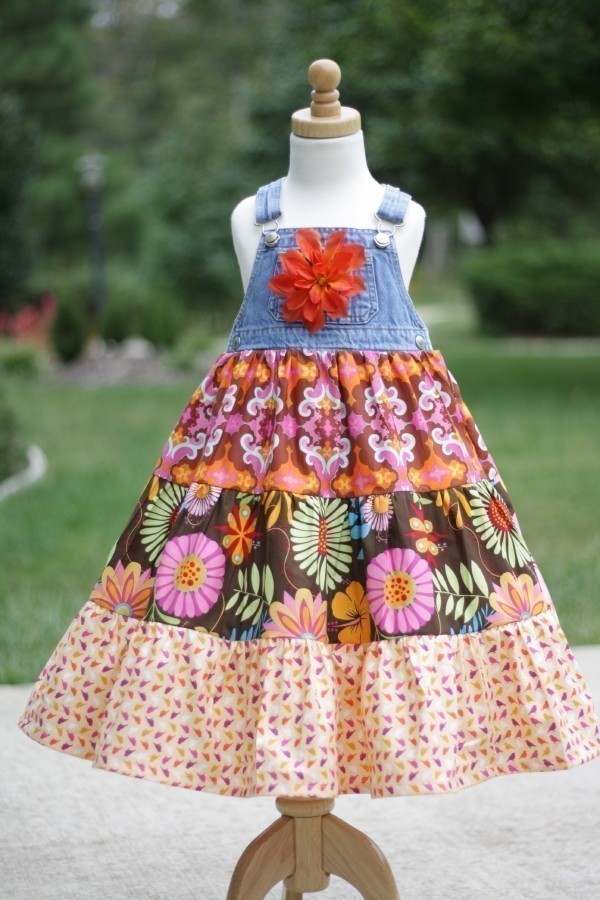
Do you love to re-cycle, re-use, upcycle old clothing? I do! For today’s post I am showing you a cute way to make a twirl dress from denim bibs! Interested? Read more below!
This pattern is one of my older ones I made for Whimsy Couture. I took it down a long time ago but thought it would be fun for you to use for free now! Hope you enjoy!
⇓———————-PIN THIS——————–⇓
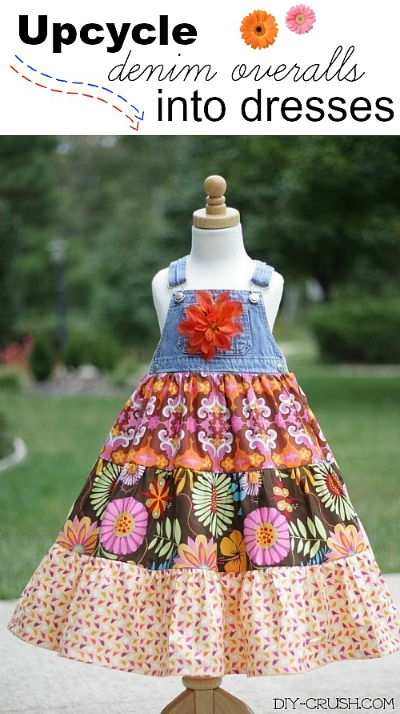
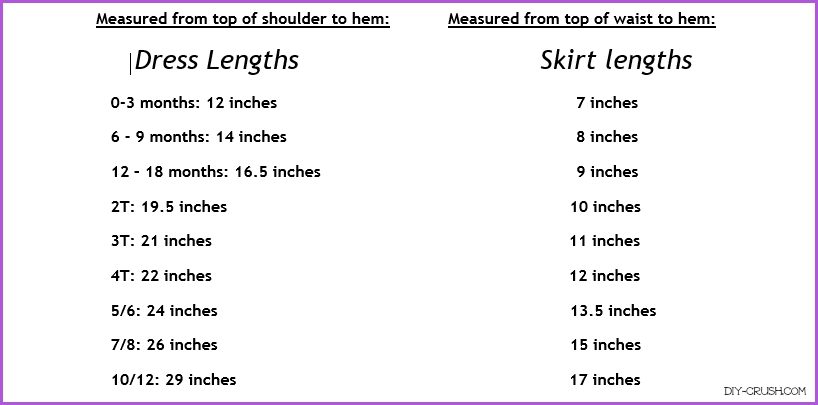
This pattern teaches you How To Make A Twirl Dress From Denim Overalls. You can also use this technique for most of your other sewing projects like skirts, peasant dresses, t-shirt dresses etc. This tutorial gives you step by step info on how to make the layers and sew them on. I provide you a sizing guide for skirt and dress lengths so you may achieve this look by simply doing your own math. These lengths are average so feel free to adjust to your needs:
Comparison Chart
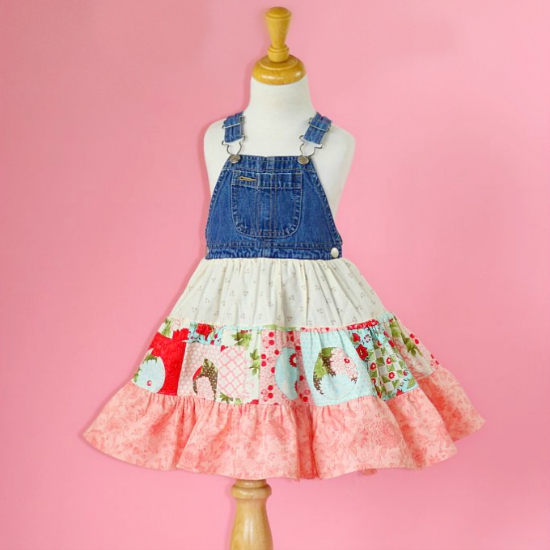
This bib dress is made by Havilah from Havilah Ashby. Now she is making doll clothing.
Depending on how many tiers (rows of fabric) you wish to have, compare those with the given length above. Add your seam allowances for every time you are connecting two rows and for the waist or the seam you are sewing this onto your existing overall, t-shirt etc. Average seam allowance should be 3/8” but you can also use 0.5 inch so it’s easier to count.
For the bottom hem count about 1 inch to the entire length. Starting out on a t-shirt/top/overall bib part, measure the width and multiply by 2. Let’s say your t-shirt/top/overall bib part measures 10 inches across your first tier of fabric should measure 20 inches long. Now, the width (actually how long it reaches down) depends on you, on how many tiers you want to add. For smaller sizes I suggest to make no more than 3 tiers. The second tier should measure the same length as the first one PLUS half! So your first tier measures 20” and your second tier should measure 30” and your third tier should measure 45” which is 30” as the second tier PLUS half which is 15”.
Sounds confusing?
Recap:
Your top’s width across plus HALF and every tier should measure HALF longer (measured from side to side) than the first one!
-
- Tier measures 20”
- Tier measures 30”
- Tier measure 45”
Here is another example……your top that you want to add a skirt part to measures 14” across. The math for this one is, take the width of your peasant top and add the same so 14” plus 14” = 28”. Then do the tiers
-
- Tier 28” plus half = 14” = 42”
- Tier 42” plus half = 21” = 63”
- Tier 63” plus half = 31.5” = 94.5”
Sew two pieces, one for each side! Most cotton fabrics only measure about 42-44 inches in width and if you need to have a length of 94.5” you need to sew as many strips of fabric together to achieve that length. NOTE: The wider the t-shirt or top is that you want to sew this twirl skirt part on the wider the actual skirt part is going to be! You may also cut down a bit on the individual lengths of each tier if you do not want the garment to be to overwhelming. I only give suggestions on how to achieve this look but the end result needs to have your own math and judgment. For this project I had an outgrewn (and wrongfully bleached LOL) overall in a much smaller size.
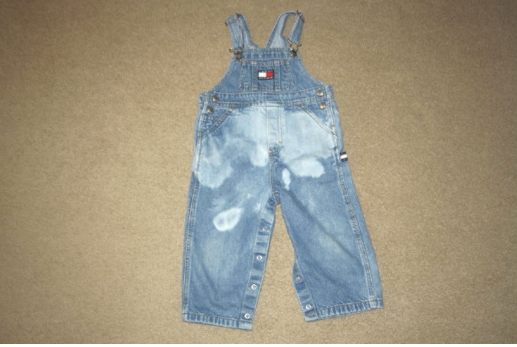
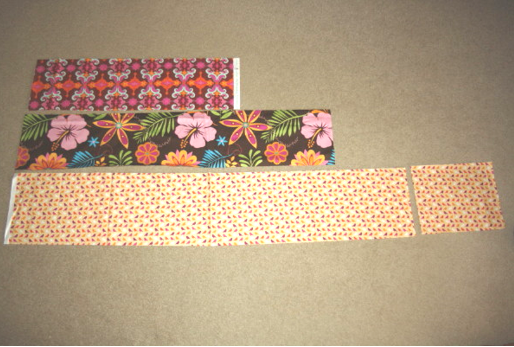
I cut the bottom part off and put it aside for another project some day. 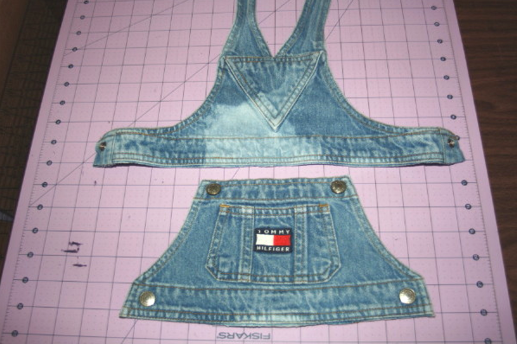 These are my three tier strips. The last one is longer than 44 inches so I have to sew the smaller piece on.
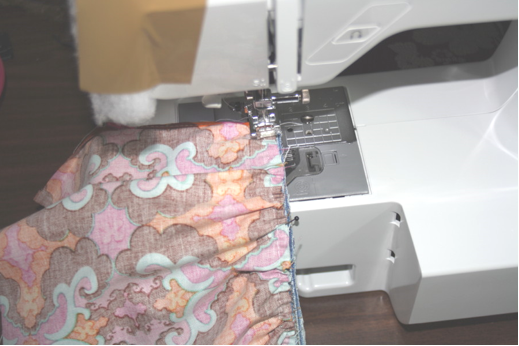
Each strip first has to be gathered. In order to do so, sew about ¼ inch away from the edge. Set your sewing machine to the longest stitch length and your tension dial to 0-1. Now take your sides and fold them down to about ¼ inch and press. Fold down once more and press. This creates the side fold which will show once your dress gets sewn together on the sides.
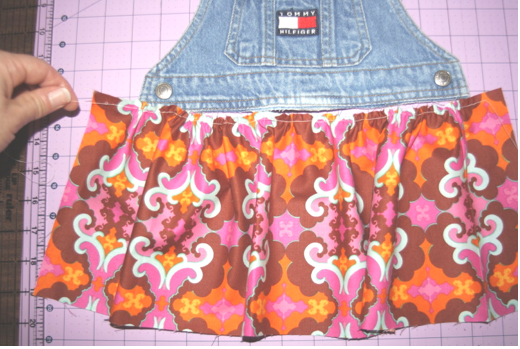
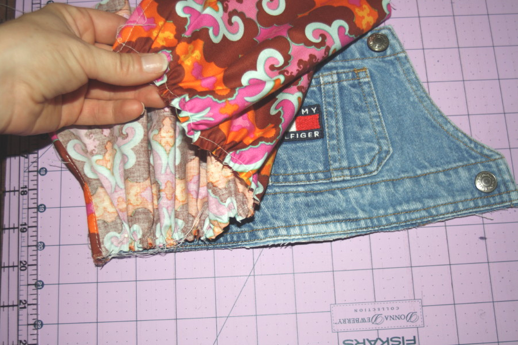
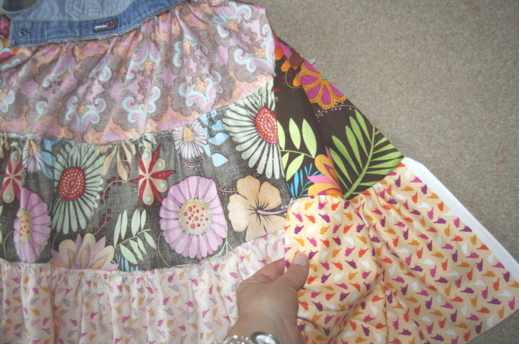
I placed my arrows to show you how far to fold and sew this side seam. Leave the bottom of the side unsewn. 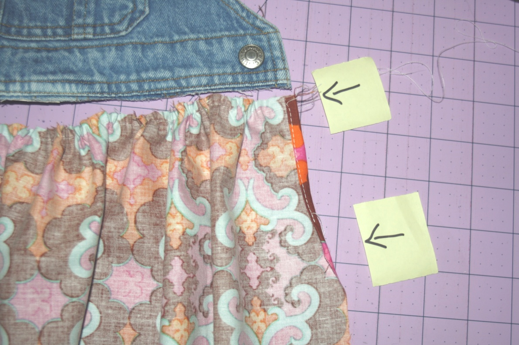 You may take your shortest strip and gather it to the top’s width. In my case it’s the cut off bib. Gently pull on one thread and do the same on the other side until it’s evenly gathered.
>> Find great sewing supplies at Amazon.com <<
Pin this gathered piece onto your top (bib part in my case). NOTE: when working with a denim bib part as I am, PLEASE be very careful when sewing. Choose a heavy duty sewing needle and wear protective glasses! I have had several needles break this way and shoot across. Sew this gathered piece on very carefully making sure your edges are flush with the bib part (or other top).
Serging is not recommended with heavy denim unless you have a heavy duty serger. I suggest carefully zigzag stitching the raw edge also ONLY with a heavy duty needle!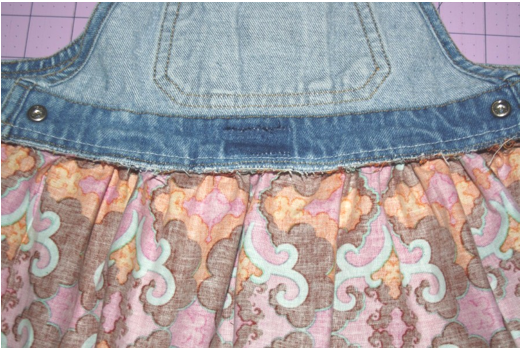 Take your second fabric piece which you have already gathered and distribute all gathers evenly to match the top tier. Sew it on with a regular needle now and serge/overcast.
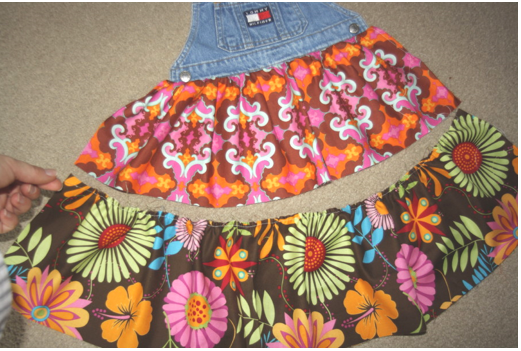 Repeat with last tier.
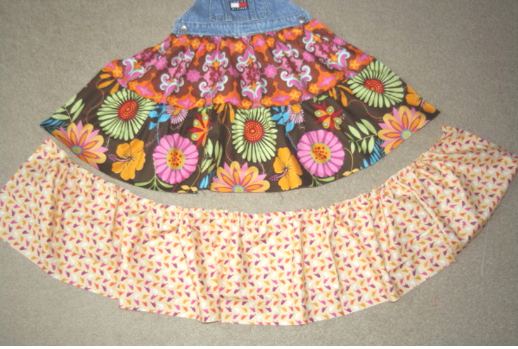
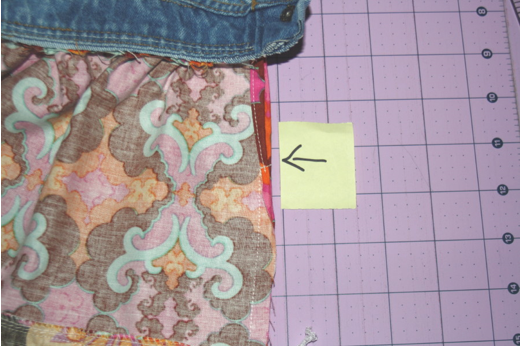
Once you are done with all tiers place the front onto the back with right sides together and match beginning where the sewn in gap is right underneath the bib part. (if you are not working on a denim overall bib part then you won’t have this gap! – then start sewing right underneath the top or t-shirt so you won’t have any gap)
This picture shows you where to start sewing if you do have a gap for the denim overall bib part. Start sewing right where the folded and sewn edge starts. I placed my arrow to show you where to start sewing.
 Once you are done with sewing this side seam go back to where you started and sew horizontally across a couple of stitches to secure this gap. Be careful not to sew into the actual skirt part! Now serge/overcast this side seam. Repeat with other side.
To finish the bottom hem fold down the edge to about 0.5 inch and press. Fold down once more to 0.5 inch and press again. This makes pinning unnecessary unless you want to pin the fold in place. Sew along the inner folded edge all the way around.

If you are working on a denim overall then you might have a bib that is sticking out a bit due to the snap button closure. Take a piece of binding tape (either store bought or hand made) and fold it down a bit as shown:
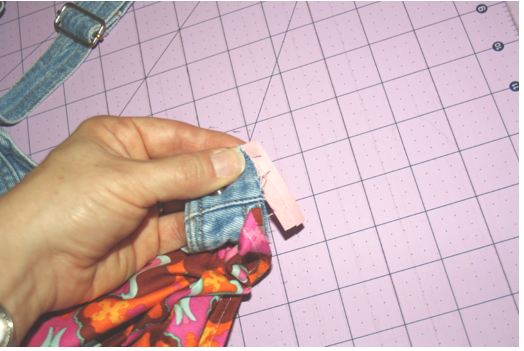
Hold it against the raw denim edge as shown and pin. Sew with a heavy duty needle on one side so it looks like this:

Fold it over to the other side and sew it down again. You may also hand stitch this task if you feel that machine sewing creates just to much hassle, which I admit it does! Sewing denim is very difficult in places where the fabric is double layered.
I hope you enjoyed this tutorial! I have many more free sewing tutorials and patterns in the ‘Sewing’ category!
If you need more denim overall recycle ideas, I found awesome DIY’s on Pinterest!

- Free Snowflake Tumbler Wrap Designs for Download - September 24, 2023
- Free Welcome To Our Farm SVG File - July 17, 2021
- Professional Overthinker SVG File – Download Today! - July 8, 2021
This is so cute and what great instructions! Love to have you share at our link party #OMHGWW
https://twochicksandamom.blogspot.com/2015/09/wordless-wednesday-46.html
Thank you so much!! So glad you like this tutorial!! I love coming to your party!
This is so cute! Would love to make something like this for my nieces!! Thank you for sharing with OMHG Wordless Wednesday link party, Evija @FromEvijawithLove x
Thank you so much for your visit, Evija!!
beautiful! love the fabric choices and the upcycle bib! Totally fab tutorial, now anyone can feel confident in making their own!
Thanks so much, Kristina & Millie!! So happy you like it!
So cute! My daughter would love this dress.
Thank you!! So glad you like it!
Aww this is so sweet 🙂 Great tutorial!
Thanks for sharing at the weekend blog hop..
Great tutorial. Visiting from Welcome to the Weekend.
Thank you so much for visiting!!
I’m always so amazed by you! This looks so good! Pinned and tweeted. I appreciate you taking the time to party with us. I hope to see you on Monday at 7. Happy Saturday! Lou Lou Girls
Thank you So much!!! Can’t wait to party with you either!!
Denise, this is so adorable. I love that you’ve repurposed a pair of overalls, pairing it with the vibrant patterns and cool colors of the ruffles is so awesome. I love creativeness and your taste, if I was a bit younger I’d make one for myself! LOVE IT!!!!
Awe, thanks Nikki!! I appreciate you saying that!!
What a fun and beautiful way to recycle a jeans bib! That’s just the kind of project I like. Unfortunately, I don’t have any little girl to make it for. But I pinned the project nonetheless. I particularly like the dress with the brown fabric. 🙂
Thank you so much, France!! I appreciate your visit!
Love this idea – such a lovely, little dress, and instructions look great 🙂
Thank you, Sarah!! I appreciate your visit!
Hi Denise. Wow, I love this. I have have chosen this as my favourite post this week for Turn It Up Tuesday over at PrettyShabbyUk.Com
Thanks for sharing it with us
Dawn xx
Oh yay! Fantastic!! Thanks so much!!
Oh my! This looks so incredible! Pinned and tweeted. We love partying with you and we appreciate you stopping by! Please take a minute to stop by next week, so we can pin and tweet your new creation. The party starts on Monday at 7 pm! Have a great Saturday! Lou Lou Girls
These look so cute! How clever 🙂 Thanks for linking up to #frifree4all
Thanks!! I appreciate you stopping by!!
My favourite part of this is you give all the different lengths and what to do. I love it so much I had to feature it at this weeks #2usesTuesday.
Thank you very much!!
What an awesome way to re-use a denim bib!!!
Cuteness! You’re so clever!!
Thank you so much, Domenica!!