This post will show you my tips and free image editing software so that you can too, how to create the perfect pinnable image that wants to be pinned and repinned. Pinterest is such an appealing virtual place to find many DIY’s and ideas and that’s because the images draw people in. It is so important to have a great image in your post to get a piece of that traffic that Pinterest brings us. Today I want to show you my favorite tips on how to create the perfect pinnable image.
⇓ – – – – – PIN THIS – – – – – ⇓
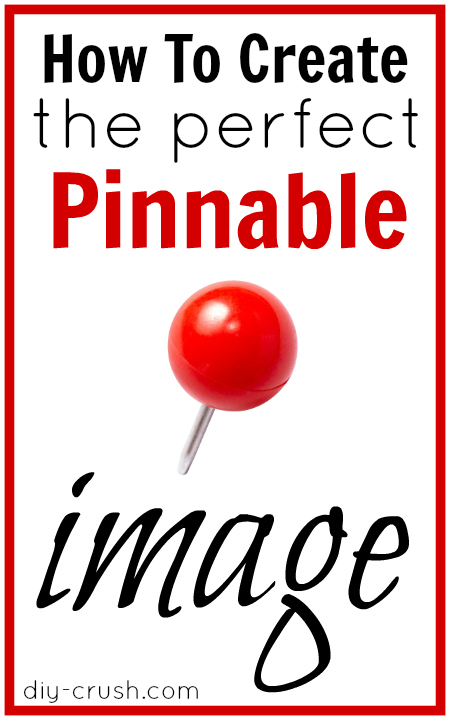
How to create the perfect pinnable image
For pretty much any type of image editing I use Pic Monkey. They offer awesome tools with their free service. For more advanced editing tools they offer a low cost subscription which I have as well but for most editing needs the free version is sufficient (their paid service starts at $2.75/month).
Proportion of the image:
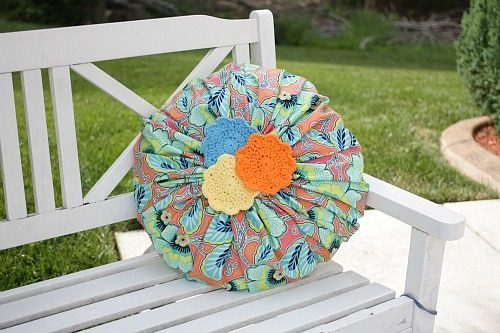
The perfect pinnable image is long, not wide. Meaning you want to either use your vertical shots as the main image to be pinned or even better, create a long image yourself. It’s actually pretty simple. When you take pictures be sure to leave some surrounding space and try not to crop the subject much so you will have room to work with when you edit the image. So instead doing a close-up, step back a few steps as in this picture which is from this post of a free pillow sewing pattern:
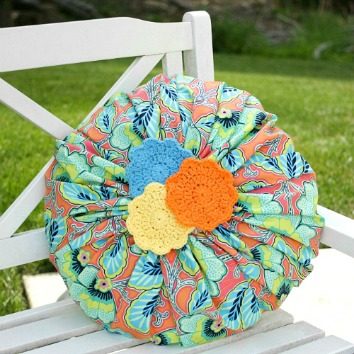
Note: in order for me to make a vertical image from the above I had to crop it to a square image first, like the one below:
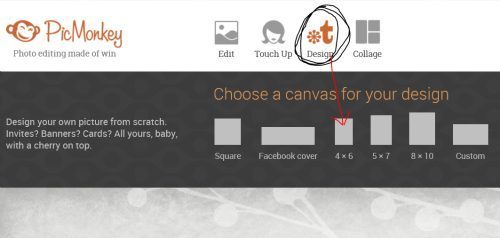
To get it to a vertical image I added it into a larger image. What I did was, on Pic Monkey’s home page I clicked on ‘design’ and chose a vertical image in 4×6:
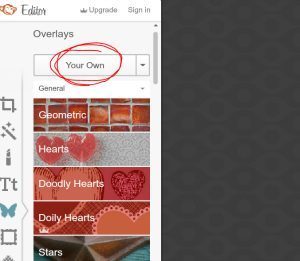
Next step is to click on the butterfly symbol on the left tool bar which is the overlay option. This allows you to insert either a symbol from their list or your own image which is what I did.

Click on ‘Your Own’ and this brings up your computer from where you can upload your own image that you have previously cropped if necessary.
Now you can move the inserted image around and adjust the zoom if necessary. I left a white space above the image to add my text later on.
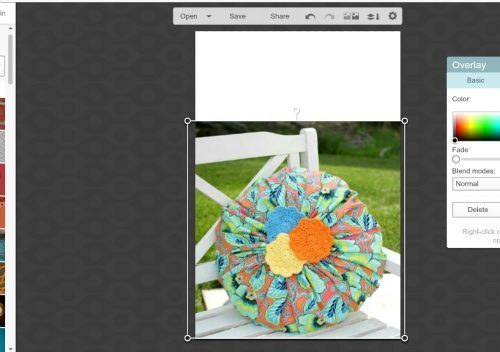
To add text to the empty space you select ‘Tt’ from the left menu and if you like to accessorize your pinnable image a tad you can add some graphics which can be selected also from the menu under the butterfly tab.
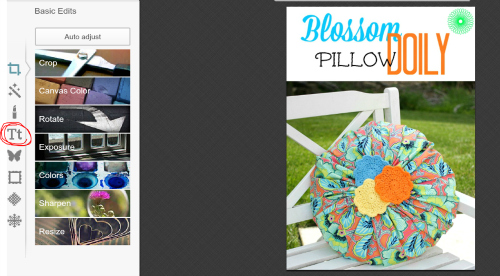
My pinnable image is almost done. Now the size isn’t exactly tall and skinny but you can certainly make yours skinny by using the crop tab on the left menu before you add the text.
Tip: adding your copyright or website URL to the bottom of the image is a wise idea so people know it’s from your website and belongs to you. I added my URL to other images.
Some say it’s 700x1000px but my experience is that also a smaller image of the size of around 450x775px for example is definitely sufficient for pinterest. The larger an image is the more disc space on your web server it will take. It might not seem like a lot if you compare the two sizes but believe me, when it comes to disc space you want to try to stay within a limit. Even if you don’t post every day, images take up a lot of room on the server plus it takes the server longer to download all your images on your page if they are huge.
Pinterest even says that their standard image width to fit their feed is 238px, see all of the important Pinterest image sizes here at this post The Pinterest Cheat Sheet to Image Sizes. So why enlarge an image that much that it takes up so much server space? One reason simply is because a larger image looks great in our posts.
It’s time to save the pinnable image! But before we hit “save to my computer” we still need to do a few more things:
Title the image
Rename images before uploading and add a description which should contain the keywords of your post. For example, when you upload your images to your computer they have letters and numbers such as IMG_3256 which otherwise would show as the description of your pin or some other portion of the text like shown here:
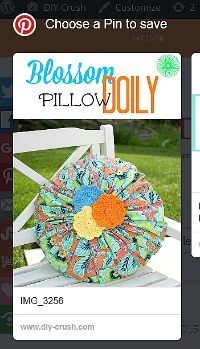
A perfect description would be like in my example “Free Blossom Doily Pillow Sewing Pattern”. For other images I included a bit more detail. The more specific keywords are in the description, the better for SEO.
You can write more if you like but keep your descriptions at 20 characters because they get repinned more often according to this study.
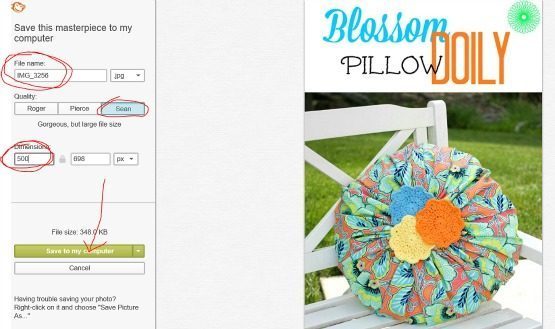
Set the quality to Sean which is the best quality and the sharpest image and change the dimension to the width you want to have for your post. In my case I chose 500px, the height will be automatically adjusted. Now you can hit ‘save to my computer’.
Before you hit ‘publish’, test how your pinnable image looks in real life.
Hit ‘preview’ in the right hand side corner of your post editor: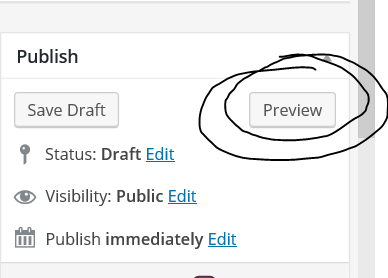
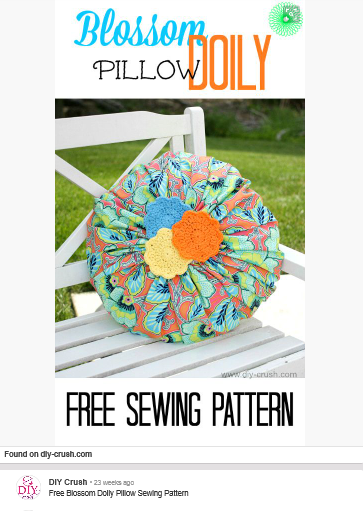
It allows you to see how your post will look once it’s published. During that time you want to test how the pinnable image you created, looks in real life. Here is my finished pinnable pinterest image:
If you liked this Pinterest tip how to create the perfect pinnable image, please follow this board on pinterest to find more great blogging tips!
We are linking up to some of these awesome blogs! Check them out to find more amazing DIY inspiration and come over to our link party on Thursdays at 7pm EST!

- Free Snowflake Tumbler Wrap Designs for Download - September 24, 2023
- Free Welcome To Our Farm SVG File - July 17, 2021
- Professional Overthinker SVG File – Download Today! - July 8, 2021
Thank you so much for sharing the step by step process. I’m trying to get better at pin-worthy images! 🙂
So happy to hear you like this tutorial!
This was such a lovely little tutorial, I didn’t know about the study keeping your description under 200 words, I’ll have to keep that in mind for my next post! Thank you so much!
-Alexa
I was also surprised when I read this but thankfully this is an important factor. Glad you like the tutorial!
Thanks for the tips, Denise. This is one of the hardest parts about writing a post to me, I always wonder how can I make the images more appealing and eye catching to be pinned.
Merry Christmas!
Pili
So happy you find this useful, Pili!! Merry Christmas!
Thank you for this! I’ve been wanting to learn PicMonkey better and your instructions were so simple and just what I needed. I appreciate your time and willingness to share!
Hi Denise,
Thanks for sharing the awesome tutorial. It is really helpful.. I have so much to learn!!!
Anika
Thanks for the tutorial. I use Tinypng which is free to compress the photos to reduce their bulk on my server. There are a ton of free picture compression software.
A great tutorial. Featured today, Denise.
This is great! Been trying to improve my pins lately. It was good timing to find this through Threading My Way. Never heard of PicMonkey. Will have to go check it out 🙂